Showing posts with label DIY. Show all posts

Tuesday, May 28, 2013

Project for the week.

So, I have my material/cut list.  Here is what I need:

Boards

(7) 1X2X40"
(2) 1X2X38 1/2"
(4) 1X2X18"
(2) 1X10X48 (for the top)
1 1/2" screws
120 grit sandpaper
liquid nail
wood filler
Stain

square
pencil
safety glasses
drill     
countersink drill bit


My project for this week is to reconstruct/modify a cabinet that I have had for years into a kitchen island.  After weeks of brainstorming, I think I have come up with a plan to accomplish this task. 

Today I will draw out my plan and make my material list.  I am going to go to Lowes and lay the material out on the floor (yea in the store) to get a visual as to how it will look.  I am going to have Lowes cut all the material to size and I will do the constructing. 

Here is a picture of the cabinet before it's transformation.


Follow/join this site to see the finished product.

Friday, April 26, 2013

Blog Changes.

As I continue with my purging and organizing my house, I am doing the same for my blogs and websites. I have found a passion for the thing called organizing.  I actually feel good, when things are in their place and I know where to find them and can.

So I am changing the look and fell of my blog.  I am trying to organize it, so that it will flow better and it will user friendly.  I hope that you are enjoying my blog.  Your comments and suggestions are always welcome.

Thursday, April 25, 2013

One room complete - Master Bath Cabinets

I finally cleaned out, purged and organized my master bath Cabinets.  It is done, finished.   Man, I had a lot of products (hair, bath and other products) in my bathroom.  A lot of the bottles were almost empty.  Why I didn't discard them earlier I don't know?  Who knows.  It is just as easy to discard at that moment you empty it as it is to put it back in the cabinet.


Here are the before pics: 


All organizing product use are from the dollar store.  Although I would love to have them all the same color, the sizes don't match for my needs. So varies colors it is.


Here's what I used:


2 green large storage binds $ 1 each


After pic of same space:


2 Medium Red Binds 2/$1


4 Small Red Binds - 4/$1


3 small baskets with handles - 2/$1
 3 green oval carry totes - $1 each

3 small square plastic storage containers with lids $1 each

7 storage boxes with hinged lids $1 each

I did not take before pics of the vanity drawers but here are a few completed pics.


After I am completely satisfied that this is working for me, I will go back and label everything. Total cost $20.00. Not bad.

I hope you enjoyed this post and as always, I am interested in knowing what you think.  What are some of your best organizing solutions?  Please comment, provide feed back, suggestions.  Also share this blog with friends and subscribe to my blog for future post.
As always, have a wonderful blessed filled day.

1Love!

Tuesday, April 16, 2013

I am seriously on a roll! Kitchen silver and utensils drawers.

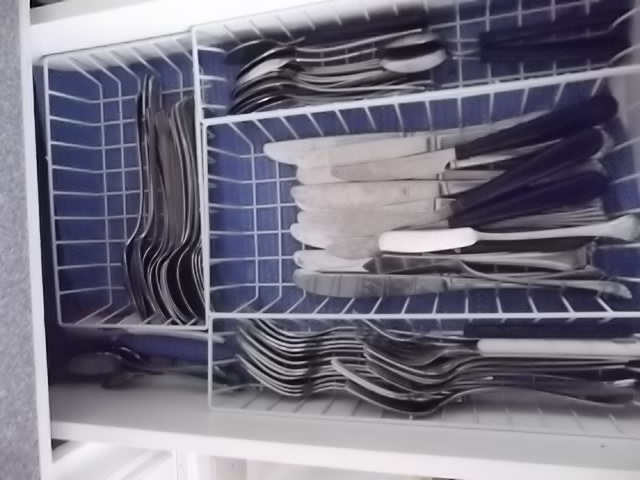
Update:  I have completed another drawer.  This is the silverware drawer.  Before I had a plastic silver tray that did not really hold all of my silverware.  So unorganized and junkie.  I am I the only one who has everything in every drawer?  Or am I the only one brave enough to show what is my mess?  I am not ashamed.  I would be more ashamed if I did not do anything about it now that I found some very inexpensive items. Don't judge me, LOL.


I purchased this wired baskets for Dollar Tree for $1.00 each.  I used 4.  


4 baskets = $4.00.  Less that half the price of another wire trays.


The title says a lot. I am seriously on a roll with this purging and organizing. In addition to cleaning out and organizing the mess that was my night stand. I also conquered 3 drawers in the kitchen.  Those three drawers it what I will talk about today.

As I have said in previous post, our lives were so busy we just live from day to day.  Barely enough time to clean, let alone organizing. However, looking back over the growing years of my kids, if we were more organized we would have not lost so much time looking for stuff.

But first let's talk bargain shopping.  The organizational items in this post came from Marshalls and Dollar Tree.  If you have a Dollar Tree in your area, they have a major stock of organizational items.  So check them out.  Prices are below the pics.

Before
 
As I sorted through the utensils, I found that I had multiples of a few items.  4 large turning forks, 3 sets of tongues,  2 garlic press (seriously, who needs 2 garlic presses), 3 manual can openers, 2 wine bottle openers (I don't even drink wine like that).  LOL and loads of chopsticks. I love chopsticks.  I don't know why but I do.
 
 
 After - Drawer 1
 I separated and arranged items in 2 drawers
This mess divider tray came from Marshalls - $6.99


After - Drawer 2
These are individual mess wire trays, I believe I got from Bed, Bath and Beyond many years ago.  I repurposed and reused them.

Please check back in a day or two for my next project.  Once I complete all these little draws and the closets, I will be moving on to some larger projects that I have on my list. Stay tuned.  I can't wait to do my office but that is a major project that will take time and a whole like of planning.  It has to right and functional the first time around.  At least close to it. 

I hope you enjoyed this blog.  Please comment and share with your friends.  Please join my blog for received notice of future post.

As always, Have a wonderful blessed day.

1LOVE

Thursday, April 11, 2013

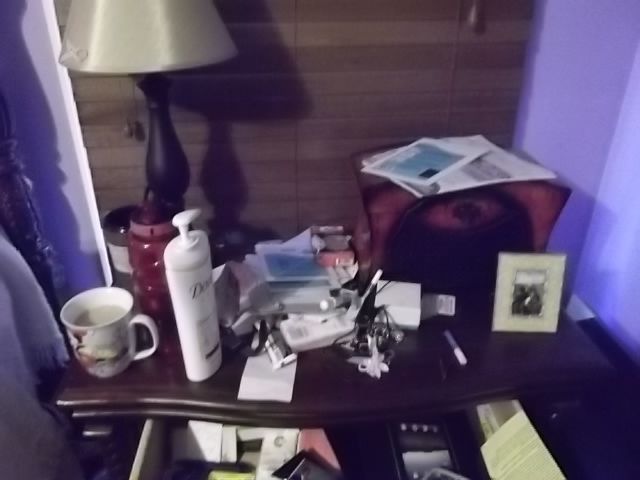
The mess that is my night stand.

If your night stand is anything like my, what a disorganized mess.  There are things in my night stand that just should not be there.  It has become impossible to find things that I think I've placed in there. So today I am tackling the mess that is my night stand.

Top Drawer


Okay wait the entire night stand is not a mess.  See, these are pictures of the bottom two drawers, which I keep organized and neat most of the time.  The bottom drawer houses my PJs and a few other things. The middle drawers has my unmentionable, lol.  You know what they are.

To keep the middle drawer organized, I used small drawer organizer for my socks and medium plastic organizer for my bras and panties. I purchased the medium ones years ago from Bed, Bath and Beyond.  I purchased the small ones about two weeks ago from TJ Maxx.  There were 3 in a pack for $2.99.  I don't recall what I paid for the medium ones.  

Middle Drawer


Bottom Drawer

 
I am a sockaholic. Yea, I said sock.  I loads of socks.  They are right now located in 3 places. I keep about 6 pair in my night stand, so if my feet get cold at night, they are close,  some are in my chest of drawers and some are ing a small basket in the closet.  With the exception of the few inmynight stand, my goal is to get them all in one place, in the chest of drawers. 

But today, I am working on my night stand. I've also have the shelf liner that I will be using in the bottom of the drawer. I purchased it from TJ Maxx for $5.99.  There are two rolls and it covers about 30 Sq feet.

I took everything out of the draw and wiped it out with a damp sponge.  Covered the bottom with the shelf liner and decided what I need beside my bed. 


And here is the finished product.  Drum roll please. 


After but before placing my ipad and laptop cooling pad in.


After placing ipad and laptop cooling pad in
 

After - Top of night stand
Need to find pics for the picture frames
Now if I can get out of the habit of throwing everything on the night stand at the end of the day.


Oh yea, by the way!  I've done so more organizing in the fridge.  Go to my refrigerator organizing blog for the update. 

Thanks for stopping by.  If you like my blog, website and organizing, please share and comment.

Enjoy and as always, have a wonderful day. 

1Love!

Wednesday, April 3, 2013

Closet overhaul A Work In Progress.

I am in the process of overhauling my closet.  This is going to take some time.  I have already performed 2 rounds of purging.  I am by no means finish with this overhaul but so far this is what I am left with.

The first few pics are from the orginal state of my master closet before I did any purging. 

Phase 1:


Ok, Don't judge my mess.  LOL


The next few pics is a quick look at my closet a few months after the first purge.  
 
 Phase 2:


Phase 3:  I will purge some more.  I will separate the short and long sleeve tops and group by color.  I have already separated the long pant/jeans from the capris.  May add a few more shelves for shoes.  The tub with the green top above has most of my summer shoes in it.  I would love to get them all out.  
 
I actually made a video but for some reason, I can not get it to upload.  I will continue to try and solve the problem. 
 
Thanks for reading my blog and as always 1LOVE.  Have a wonderful day. 


Saturday, March 30, 2013

The Kitchen!

Yesterday, I started working on organizing my kitchen.  This too will be done in stages.  I will be an on going process.  Because I don't have everything, I think I need on hand to organize my entire house, I have to organize in stages.  I  need to plan what I am going to do, how to do it, have some idea what products I need and then shop around and purchase them.  Because I am trying to organize on a budget, well I guess I should since that is the name of the website, LOL, I have to take my time and find the best product at the most budget friendly price. 

So this is the first cabinet in my kitchen, that I tackled.  The first picture is not the cabinet at it's worst.  I had already cleaned it up a little before, before I decided to make this a full organizational over haul.


The next picture is the final organizational product.  If I must say so myself, it came out very well.


Where I got the products: 
Top Shelf:  Container on the left came my TJ Maxx.  Set of 5 seal tight containers for $14.99
White basket on left came from Big Lots many years ago.  I don't remember the price. I saw them at Target this week.

Middle Shelf: Assortment of jar.  The 3 larger jars on the back row came from Carolina Pottery in Smithfield, NC.  First one on the front row, I already had.  2 smaller ones on the back row and the smaller one on the front row came from TJ Maxx.  $2.00 each and the mid size one on the front row came also came from TJ Maxx and was $3.00  Guys, I had never thought about looking in TJ Maxx for such items.  I will not sleep on TJ Maxx anymore.

I made a video on the products that I purchased from TJ Maxx.  I will try to upload it soon. 

Bottom Shelf:  The 2 wicker baskets came in 2 different sets of 3 baskets, that I purchased many many years ago from Lowes Home Improvement.

You can also find nice food storage jars at Hobby Lobby, Michaels and Walmart.  Of the 3 I found Hobby Lobby to be the least expensive.

One cabinet down 10 to go. 

Comments, suggestions or questions are always welcomed.

As always have a wonderful day.  1LOVE!

http://www.getorganizedonabudget.com

Sunday, January 27, 2013

About my blogs.

I will blog on past renovations, current and future projects.  Successful and failed attempts.  Products I've tried and feel was not worth the  money and those that was well worth every penny. I have learned that sometimes you just should spend a little more money to get the look and quality you want.

I have tried some many products to accomplish the same job.  Sometimes I did not do enough research and sometimes the perfect product comes out after you have tried other products that did not work for you.  I have learned when I want to do a project to do the research on available products/material then wait several months before purchasing the material to do my project.  It has never failed that once I purchase the material something new and sometimes better comes out. 

I have very good intentions.  Never the less, I also have a long list of project that I have started but did not complete.  So I am making a list of all my projects and by the end of the year all will be completed.  I will blog each and every one of them.  I will list them all in my next blog.  Stay tune and stay in touch.  Comments and questions are always welcome. 

Saturday, January 26, 2013

I have been in my house 13 years and have not really done any major updates. A couple of years ago, I decided to pull up all the carpet and replace with laminate flooring.  I went through 4 different products before I finally found the one that I really like and works for me.  It is easy to install.  I replaced the flooring in the living room and hall twice, in the 3 bedrooms once, however in the master bedroom, I ended up putting down flooring that is completely difference from the other bedrooms and the living room and hall.  I found this product/flooring at home depot. 


Master Bedroom after carpet is taken up


I wished I had found this product before I installed the living room and hall flooring the first time.  Click this link for the flooring:  http://www.homedepot.com/Flooring-Vinyl-Flooring-Resilient-Flooring-Resilient-Vinyl-Planks/h_d1/N-5yc1vZbzjz/R-202075773/h_d2/ProductDisplay?catalogId=10053&langId=-1&storeId=10051

It was so easy to put down.  My floor was even so there was only vacumming the subfloor as my prep work, after taking up the carpet.  Oh yea, make sure all the carpet staples are removed from the subfloor.  All you need is a box cutter and a straight edge as a guide.  When you need to cut a plank just line up with the area, determine where you need to cut, score it on the back of the plank and then snap into.  Just lay the plank down and connect the adhesive strips. If you need to take up a strip to reposition or replace, just use a blow dryer on the strip and pull up.  So easy.  I wish I had taken pictures of the installation.  When I replace the living room and hall, I will show you how easy it is to install.   Below are the pictures of my bedroom from being to the finished product.

The flooring is a fraction of the cost of hardwood but gives the look of hardwood.  I am so in love with this flooring. 


Please ignore all the extra stuff laying around that I had not put away before taking the pictures. 


I hope you enjoyed this blog.  Leave a comment and let me know what you think of the blog and the flooring.  I have decided to blog the other floor installations, the results and how I feel about them.  Please stay tuned or come back.